Osborne Builder's Studio: How to Build a Custom Jewelry Box
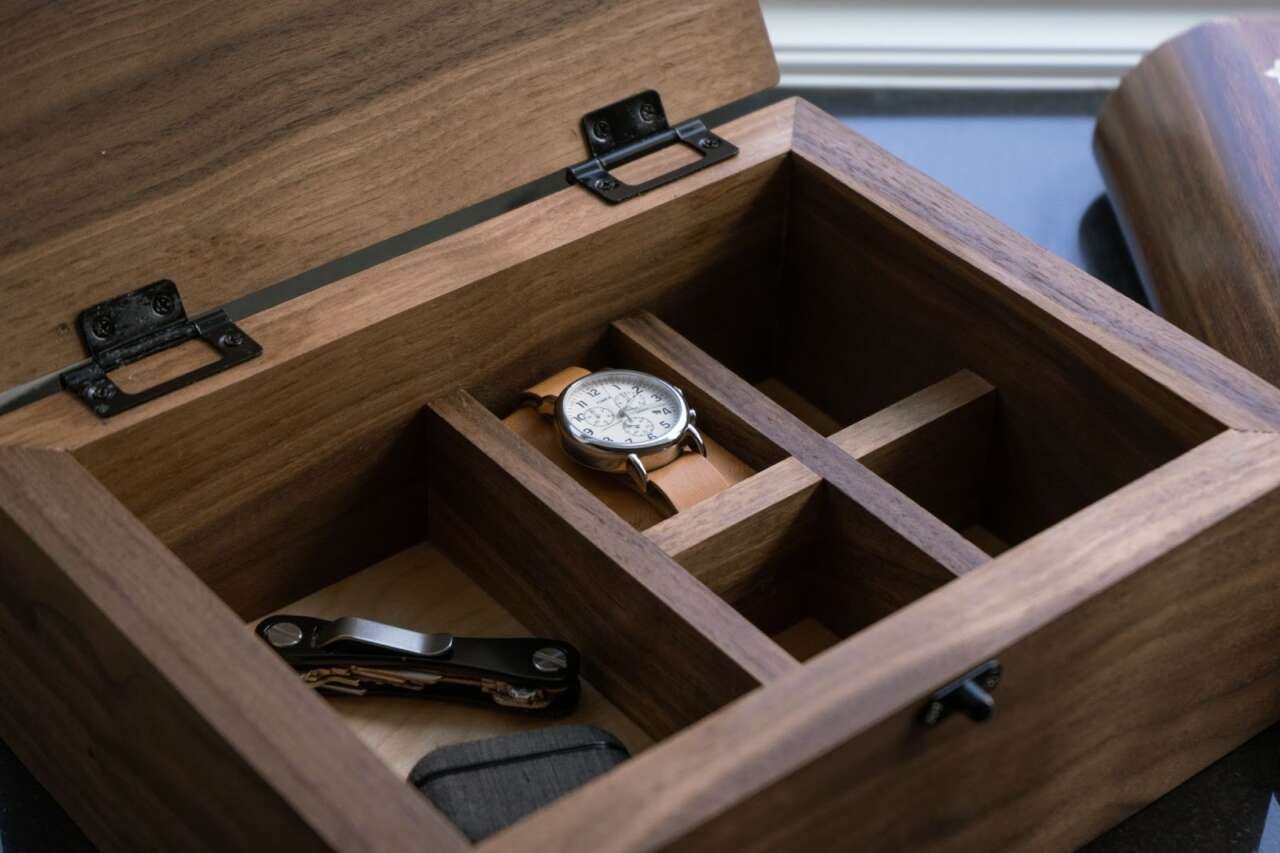
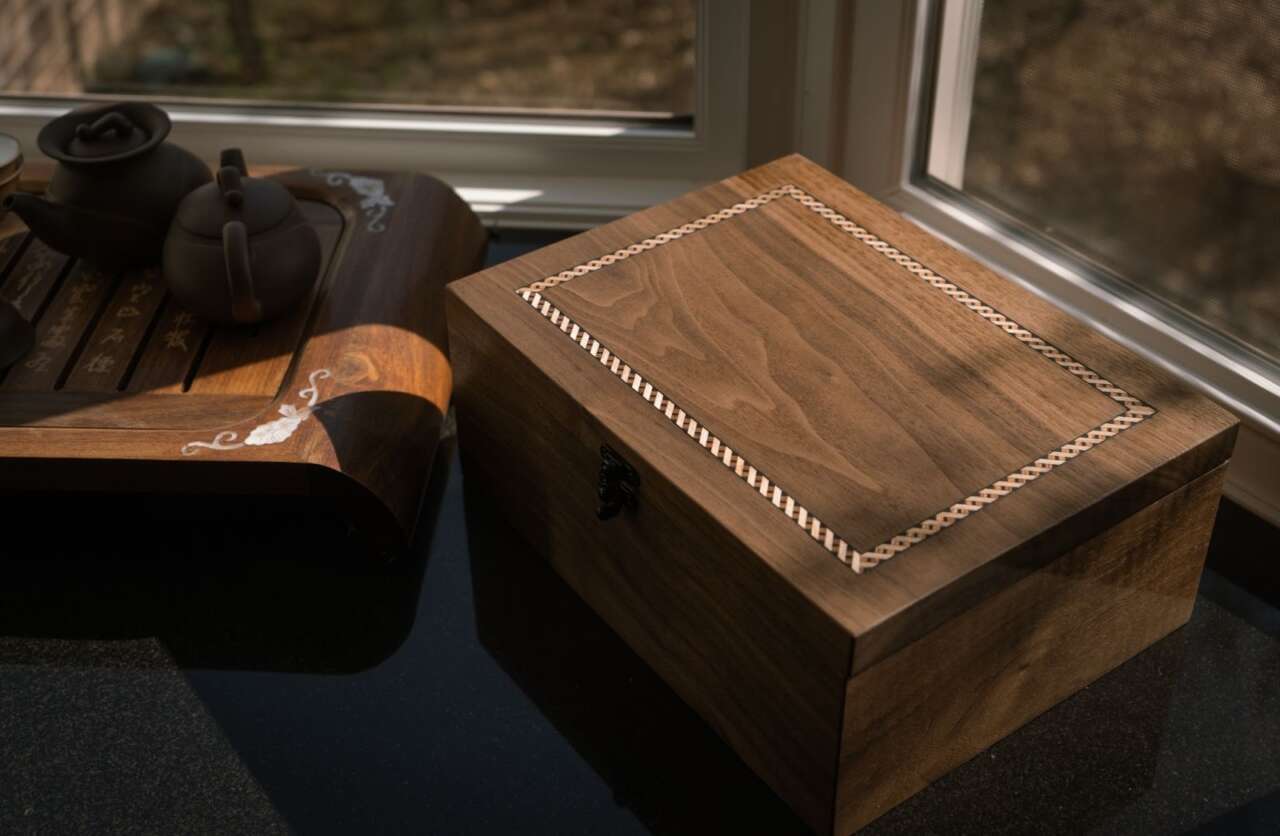
We recently built a stunning walnut jewelry box and we want to share the details so you can build a custom jewelry box, as well! This is a great project if you are just starting out with decorative boxes and is sure to be a great gift for birthdays or holidays. We offer a wide selection of decorative wood inlays that can add a stylish touch to almost any project.
 |  |
Assembly Instructions
Overall Dimensions: 12" x 9" x 5"
- Box: 12” long, 9” wide, 4” tall (1” thick material)
- Top: 12” long, 9” wide, 1” thick
- Dividers: Two 7” x 2” x ½” pieces; two 2 ¼” x 2”
x ½” pieces - Bottom: ¼” thick plywood cut to size of dado
- We used dimensional lumber from Osborne for the materials above
- Osborne inlays: Different based on your choice (we used the 3/8” wide x 1/32” thick Hermes Inlay Strip)
You will need:
|
|
Cutlist:
| Part | Qty. | T | W | L | Notes |
| Top | 1 | 1" | 9" | 12" | |
| Short Sides | 2 | 1" | 4" | 9" | Mitered |
| Long Sides | 2 | 1" | 4" | 12" | Mitered |
| Bottom Panel | 1 | 1/4" | Depends on how deep your dado is. Measure according to your specs. | ||
| Long Dividers | 2 | 1/2" | 2" | 7" | |
| Short Dividers | 2 | 1/2" | 2" | 2 1/4" | |
| Osborne Inlays | 4 | 1/32" | N/A | N/A | Inlays are sized based on the distance they are inset from the edge. |
Instructions:
Cut all the pieces of the box
Begin by first cutting all of the pieces for your mitered box to their final length and width. Cut two pieces for the long sides at 1” x 4” x 12”. Cut two pieces for the short sides at 1” x 4” x 9”. All of these cuts will be mitered at the corners once you choose your desired board orientation (we did a 45° angle).
Cut the dados for the bottom panel
Next, you will need to cut the dados for your bottom panel. To cut the ¼” dado, first decide what tool you have to safely make the cut (i.e. Miter Saw, Table Saw, Router). Once you have your tool set up, you can cut the dados into the boards you completed from Step 1. We chose to do a ¼” deep x ¼” wide dado in order to keep things easily measurable. This may be adjusted depending on how deep you would like your bottom panel to sit into your sideboards. You may also choose how far up the inside of your box you would like for your bottom panel to sit. We chose ¼” for this as well.
Cut the bottom panel
Once you have cut your dados, you will now need to cut the bottom panel itself. We chose to use ¼” thick plywood for this. First, use painters tape to tape up your mitered boards to form a dry fit of your box. Then, you can measure the overall size of your mitered box and subtract the amount that you dadoed out. This should give you the measurement needed for your bottom panel.
Glue the main assembly together
Now that you have the sides of your box and your bottom panel prepared, you can begin to glue the main assembly together. We chose to use the “painter’s tape method” once again. Simply lay out all of your pieces, apply painters tape to each “fold” and insert your bottom panel into the dados. Then, apply the wood glue of your choice on each mitered surface. Do not overapply, a little goes a long way. Secure the assembly with clamps and let dry for a few hours.
Cut the top to size
While you wait for your box to dry, you can move on to cutting your top to size. Simply cut your board to 1” x 9” x 12” using the tool of your choice. You are now ready to work on routing out for your inlays.
Route for inlays
Select a spiral router bit that is the width of your chosen inlay. Once you have your bit secured in your plunge router, set the depth of your plunge to 1/32” deep. This will give you a flush and seamless transition on your top. Next, you will need to choose how far in you would like your inlays to sit on your top. We chose 1” from the edge. Once you have marked where you want to cut on your top, clamp down the top along with a guide or straight edge to prevent wandering. Slowly work your way to each corner, being careful not to go past your measurement.
Cut inlays and apply them
Now that you have a channel for your inlays, measure and miter cut your inlays to size then glue them in. A fresh razor blade or utility knife is great for a quick cut. Apply a small amount of glue in each channel, do not overapply, and firmly press your inlay strips into place. To maintain pressure while drying, we placed a cutoff piece over our top and added weight to it.
Create the internal dividers
While your top is drying, you can move onto cutting the pieces for your internal dividers. These can be sized to your desired layout. We decided on four watch storage cutouts. To do this, we cut two pieces to ½” x 2” x 7” and two pieces to ½” x 2” x 2 ¼”. Apply a small amount of glue to each side that will be in contact with your box and add clamping pressure from the top and side.
Drill for hardware
Once everything is dry, begin drilling for your hardware. Depending on the hardware you use, installation may differ. Lay out your hardware and mark where your pre-drilled pilot holes will be. Be sure to use a bit just slightly smaller than your screws. After you have a pilot hole for each screw, lineup your hardware and tighten each screw by hand with a screwdriver.
Sand everything and finish
Now that your box is assembled, sand everything that you did not pre-finish and apply the finish of your choice. We hope you enjoy your beautiful wooden jewelry box!


