Osborne Builder's Studio: DIY Upholstered Bench
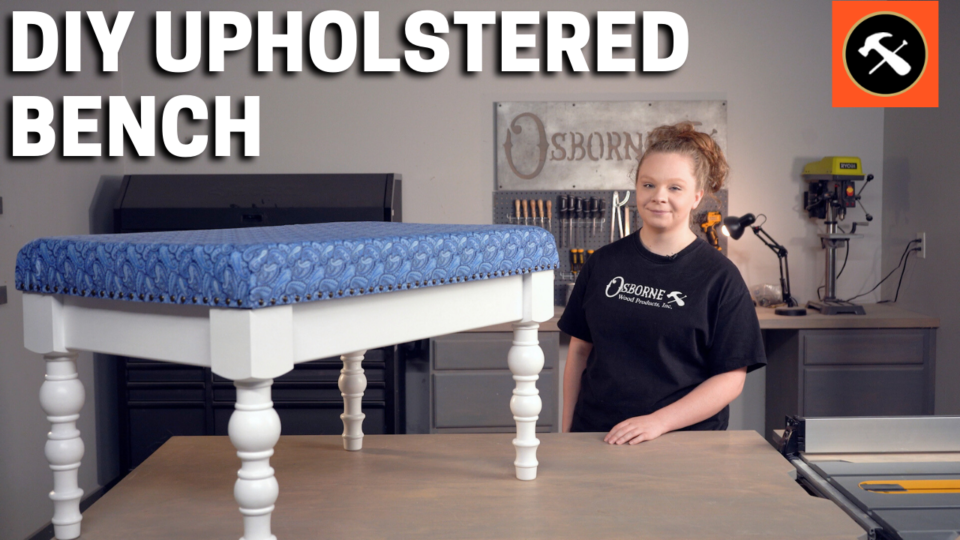
In this episode of the Builder's Studio, we're showing you how to build your own DIY Upholstered Bench! This is a great option for a quick weekend project and can be very low cost! We sourced the fabric of our choice at the local craft store, then paired it with Osborne's Slagle Wood Designs Coffee Table Legs (Part #142264) and a Custom Table Base Kit. Upholstery and assembly is simple and DIY friendly!
Watch the video below for a step-by-step tutorial of this build. The written instructions can also be found below the video.
Assembly Instructions
Overall Dimensions: 24” x 36” x 22”
What we used:
|
|
Other items needed:
|
|
Instructions:
Step 1
Cut your plywood and foam to your desired bench top size.
Step 2
Apply the spray adhesive to the plywood and the foam. Firmly press the foam onto the plywood.
Step 3
Cut your fabric (if necessary) and place it on top of the foam. Make sure that you have enough excess fabric so that you can comfortably cover the sides and wrap the fabric underneath the plywood for attachment.
Step 4
Flip everything over so that you are working with the bottom of your bench seat. Overlap the fabric on each side and staple the center point for each side of the fabric to the plywood. It is helpful to hold the fabric tight with your other hand to create even tension while stapling.
Step 5
Once the center points are secured, you can work your way out to the edge of each side. Continue holding the fabric tight as you add additional staples from the center to the edges. Leave the corners unsecure.
Step 6
You will have excess fabric in each corner. Fold the fabric on top of itself however you would like and staple as you go to cover each corner. There may still be excess fabric that can be trimmed.
Step 7
Assemble your table base kit from Osborne. This includes piecing together your apron boards and table legs with the mortise/tenon joinery and the pocket hole. An in-depth tutorial on this process can be found here.
Step 8
Once your table base is assembled, paint or finish it according to your preference.
Step 9
Place your bench top upside down with the base upside down on top of it. There are pocket holes available for you to easily attach the top and base.
Step 10
Optional: Attach decorative tacks along the bottom edge of your bench seat. This creates a nice accent to the fabric. We discovered the center point of each side and measured an equal distance between each tack for a uniform look. Add the tacks all around the seat.
